


To Use genmenu
1. Compile "genmenu.cbl".
2. Create a text file that describes your menu(s).
3. Run genmenu on that text file to create a file of COBOL code. (Used later in Step 5.)
4. Include the COPY file "acugui.def" somewhere in your Working-Storage section.
5. Name the generated COBOL file (from Step 2) in a COPY statement in your Procedure Division.
6. Build the menu: use one PERFORM statement in your application to cause each menu to be built.
7. Display the menu: CALL W$MENU to cause one menu to be displayed.
These steps are described in detail in the pages that follow.
Step One
To compile genmenu:
ccbl -x -o genmenu genmenu.cbl
The input to genmenu consists of a normal text file that you create using your editor. This file contains the descriptions of one or more menus. You may place blank lines freely in this file as well as comment lines that start with either "*" or "#" in column one. You may use either upper case or lower case when creating menu files.
Each line in a menu file consists of one or more fields. Fields are separated from each other by spaces. You may also use commas and tabs as field separators. Initial spaces in a line are ignored. Here's a small example:
MENU  main-menu
    "&File",            0,   submenu
        "&New",         101
        "&Open",        103, disabled
        "Save &As...",  104
        separator
        "E&xit",        105
        end-menu
You start a menu by placing the word "MENU" (for a menu bar) or "POPUP" (for a pop-up menu) on a line followed by a menu name. A menu name may be up to 20 characters long and must be formed like a COBOL identifier (it will be used to build a COBOL paragraph name). The menu name does not appear in the generated menu bar.
Following the "MENU" or "POPUP" line, you enter one line for each menu entry that belongs to that menu. You end a menu by one of the following:
Each item in a menu needs both a label (the text that appears on screen) and a numeric ID. So, each menu entry consists of the menu label (in quotes) followed by its ID value. Use lower and upper case in the label so that it appears exactly as you want it to appear on the menu. The ID value may either be a number or the name of a level 78 that you will define in the final program. It should be greater than zero and less than or equal to 4095 (exception: it may be zero for submenus or separators).
When you're typing the label, place an "&" character in front of the letter that will be the entry's key letter. The user can access that menu entry quickly by typing the key letter at the keyboard. The key letter will appear underlined when the menu is displayed (unless you've specified some other appearance--see section 8.12). Under the Windows environment, the user must press <Alt> and then type the key letter to make a menu choice with a key letter. (Menu options can also be selected with the mouse, if one is available and enabled. See Chapter 7.)
A shortcut key is a keyboard key that you have designated in your program to perform the same action as a menu item. You must create a programmatic association between the menu item and the key. One easy way to do this is to make the menu item's ID value the same as the exception value of the keystroke.
You may display the shortcut key's text next to the menu item in your menu if you want. To specify the shortcut key's text, place it immediately after the characters "\t" in the item's label. For example, if you want to create a menu item that has the text "Exit" and you want to display the shortcut key text "Ctl-X" next to it, you would specify "Exit\tCtl-X" as the item's label. You might think of "\t" as specifying a "tab" character that separates the two columns when they are displayed in the menu. If you need to include "\t" in your menu label, specify "\\t" to prevent it from being interpreted as a shortcut key indicator.
Menu flags
After an entry's ID, you may optionally enter up to three flags. These flags are these words:
CHECKED The menu entry starts with a check mark placed by it (enabled).
DISABLED The menu entry starts disabled.
SUBMENU The menu entry leads to a submenu. Subsequent menu entries refer to items that will be placed in that submenu. You complete a submenu by placing the word "END-MENU" on a line by itself. After completing a submenu, resume listing menu entries that appear on the parent menu.
Separators
Finally, you may enter a separator menu item by using the word "SEPARATOR" (without quotes) in place of the menu's label and then optionally listing a menu ID for it (if you omit the ID value, it will be treated as zero).
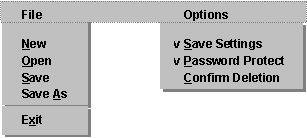
For example, the following menu file would describe one menu that consists of two items, each one of which has a submenu:
MENU main-menu
    "&File",    0,  submenu
        "&New",                    101
        "&Open",                   102
        "&Save",                   103
        "Save &As...",             104
        separator
        "E&xit",                   105
    end-menu

    "&Options",                    0,   submenu
        "&Save Settings on Exit",  201, checked
        "&Password Protect",       202, checked
        "Confirm Deletions",       203
        end-menu
When your text file is complete, you can use genmenu to create the COBOL source code that builds the menu. Use the following command:
RUNCBL genmenu menu-file copy-file
where menu-file is the name of your text file that describes the menu and copy-file is the name of the file that will hold the generated source code. You may omit copy-file, or both menu-file and copy-file. If you do, genmenu will prompt you for these names. Note that because genmenu is a COBOL program, it will use any FILE-PREFIX and FILE-SUFFIX variables that you have set in your configuration file.
Under graphical systems, genmenu will pause when it is done and will give you an opportunity to view its output. Press <Enter> to continue. If you are running genmenu from a batch file or a makefile and do not want to see the output on a graphical system, specify "-1" on the command line. On a character-based system, genmenu is designed to run as a quiet utility that has no screen output.
If genmenu detects any errors, it will display them, along with the line number of menu-file that caused the problem. Otherwise, it will simply place the generated source code in copy-file.
Step Four
Somewhere in your Working-Storage section, include the line:
COPY "acugui.def"
Step Five
Somewhere in the Procedure Division of your application, include the line:
COPY "copy-file"
Step Six
The COPY file created by genmenu will contain a paragraph called "BUILD-MENU-NAME" where MENU-NAME is replaced by the name you gave in the "MENU" line of your text file. This paragraph contains all the code necessary to produce the menu you described in your file. If you have more than one menu in your text file, then the COPY file will have a paragraph for each of these menus.
You execute each one of these paragraphs with a PERFORM statement. For example:
PERFORM BUILD-MAIN-MENU.
When the PERFORM returns, it will have set the data item "MENU-HANDLE" to a value that uniquely identifies the created menu. MENU-HANDLE is declared in "acugui.def" as a numeric data item.
If MENU-HANDLE is set to zero, then it indicates that an error has occurred in the creation of the menu. This is typically due to the system's running out of memory. Otherwise, "MENU-HANDLE" contains a valid identifying value. This value is called the menu's handle.
If you plan to use more than one menu, move MENU-HANDLE to another variable so that you don't lose the menu's unique identifier when you PERFORM the code that constructs the other menus. The variable you use must be declared as PIC S9(9) COMP-4.
For example:
MOVE MENU-HANDLE TO FILE-MENU-HANDLE.
Step Seven
To display a menu in your application, be sure that MENU-HANDLE does not have a zero value (zero indicates an error). Then:
CALL "W$MENU" USING WMENU-SHOW, MENU-HANDLE
The variables in this call are declared in "acugui.def". This call will cause your menu to be displayed to the user. The user may immediately begin entering menu commands.
In the following code fragment, two menus are created and, if the build is successful, the main menu is displayed:
PERFORM BUILD-MAIN-MENU.
MOVE MENU-HANDLE TO MAIN-HANDLE.
PERFORM BUILD-MAIL-SYSTEM-MENU.
MOVE MENU-HANDLE TO
        MAIL-SYSTEM-HANDLE.

IF MAIN-HANDLE NOT = ZERO
    CALL "W$MENU" USING
        WMENU-SHOW, MAIN-HANDLE.