


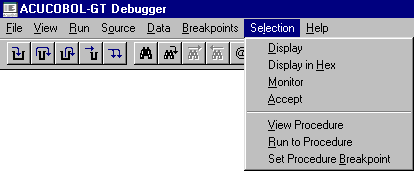
The Selection menu lists actions you can take on the current selection.
The Selection Menu (Windows).
A selection is a variable or procedure name that you have highlighted in the source window. If you do not have a mouse, use the arrow keys to move to the desired line and then press <tab> to highlight the desired name.
*Display shows the contents of the selected variable. Numeric variables are converted from their internal formats to show their values. Other variables are shown as text.
You can also perform this by double-clicking the left mouse button on the desired variable.
*Display in Hex shows the contents of the selected variable in hexadecimal notation. Allows you to view the internal storage of every byte in the variable.
*Monitor sets a monitor on the selected variable. Changes to a monitored variable cause control to return to the debugger. This feature gives you the option to have the COBOL program stop executing, and the debugger to activate, when the value of a monitored variable changes. When this happens, the debugger window becomes the active window, and the variable and its value are displayed in the command area of the debugger.
When any variables are monitored, a new window is created as a sub-window of the main debugger canvas, located at the top of the screen. This window, called the "Watch Window", shows all the monitored variables and their values, one name/value per line (values which exceed the size of the window are truncated). By default, the Watch Window contains as many lines as there are variables being monitored, up to a maximum of three (3). If you select more than 3 variables for monitoring, you can scroll through the Watch Window to view them all, or you may set a larger Watch Window size with the Window Size option from the Source menu. This is what a Watch Window looks like:

*Accept "accepts" a new value for the selected variable. For numeric variables, the value you enter is converted to the variable's internal storage format.
*View Procedure scrolls the source window to the start of the selected procedure.
You can also perform this by double-clicking the left mouse button on the desired procedure name.
*Run to Procedure sets a temporary breakpoint at the selected procedure and continues program execution. The program runs until it reaches the selected procedure (or another breakpoint).
*Set Procedure Breakpoint sets a permanent breakpoint at the selected procedure.
Up and Down are available only for non-Windows environments. Windows users can perform the same tasks by using the scroll bar to the right of the debugger screen.
*Up scrolls up towards the top of the source code by one-half screen.
*Down scrolls down towards the bottom of the source code by one-half screen.
Help for Windows users is discussed in the next section. In other environments, you can get help by typing the letter "H" and pressing <return> at the debugger prompt.
The following debugger commands are available but are not shown on the debugger menus:
*F1, Page Up scrolls source up one page.
*F2, Page Down scrolls source down one page.
*F5 (or the Up arrow) moves the source cursor up one line.
*F6 (or the Down arrow) moves the source cursor down one line.
*F7 causes the cursor line to be searched for program variables. If one is found, its name and current contents are displayed. Press F7 multiple times to cycle through all of the variables on the line.
F7 (display variable on current line) and the Tab key (highlight variable on current line), as well as the mouse, also pay attention to qualified and indexed data items in the source. As long as a variable and all of its qualifiers and indexes are on one line, the entire expression is evaluated by these keys. If a variable and all of its qualifiers and indexes span multiple source lines, the entire expression is ignored, but component items are still found.
*F8 Edit Command causes the last command entered to be recalled for editing. Useful for correcting typographical errors.
*H, Help Key displays a screen of summary help information.